Step-by-Step Vendor
Registration Guide
Angler Guided Walkthrough
Step-by-Step AU Vendor Guide (PDF)
Step 1: Create an account
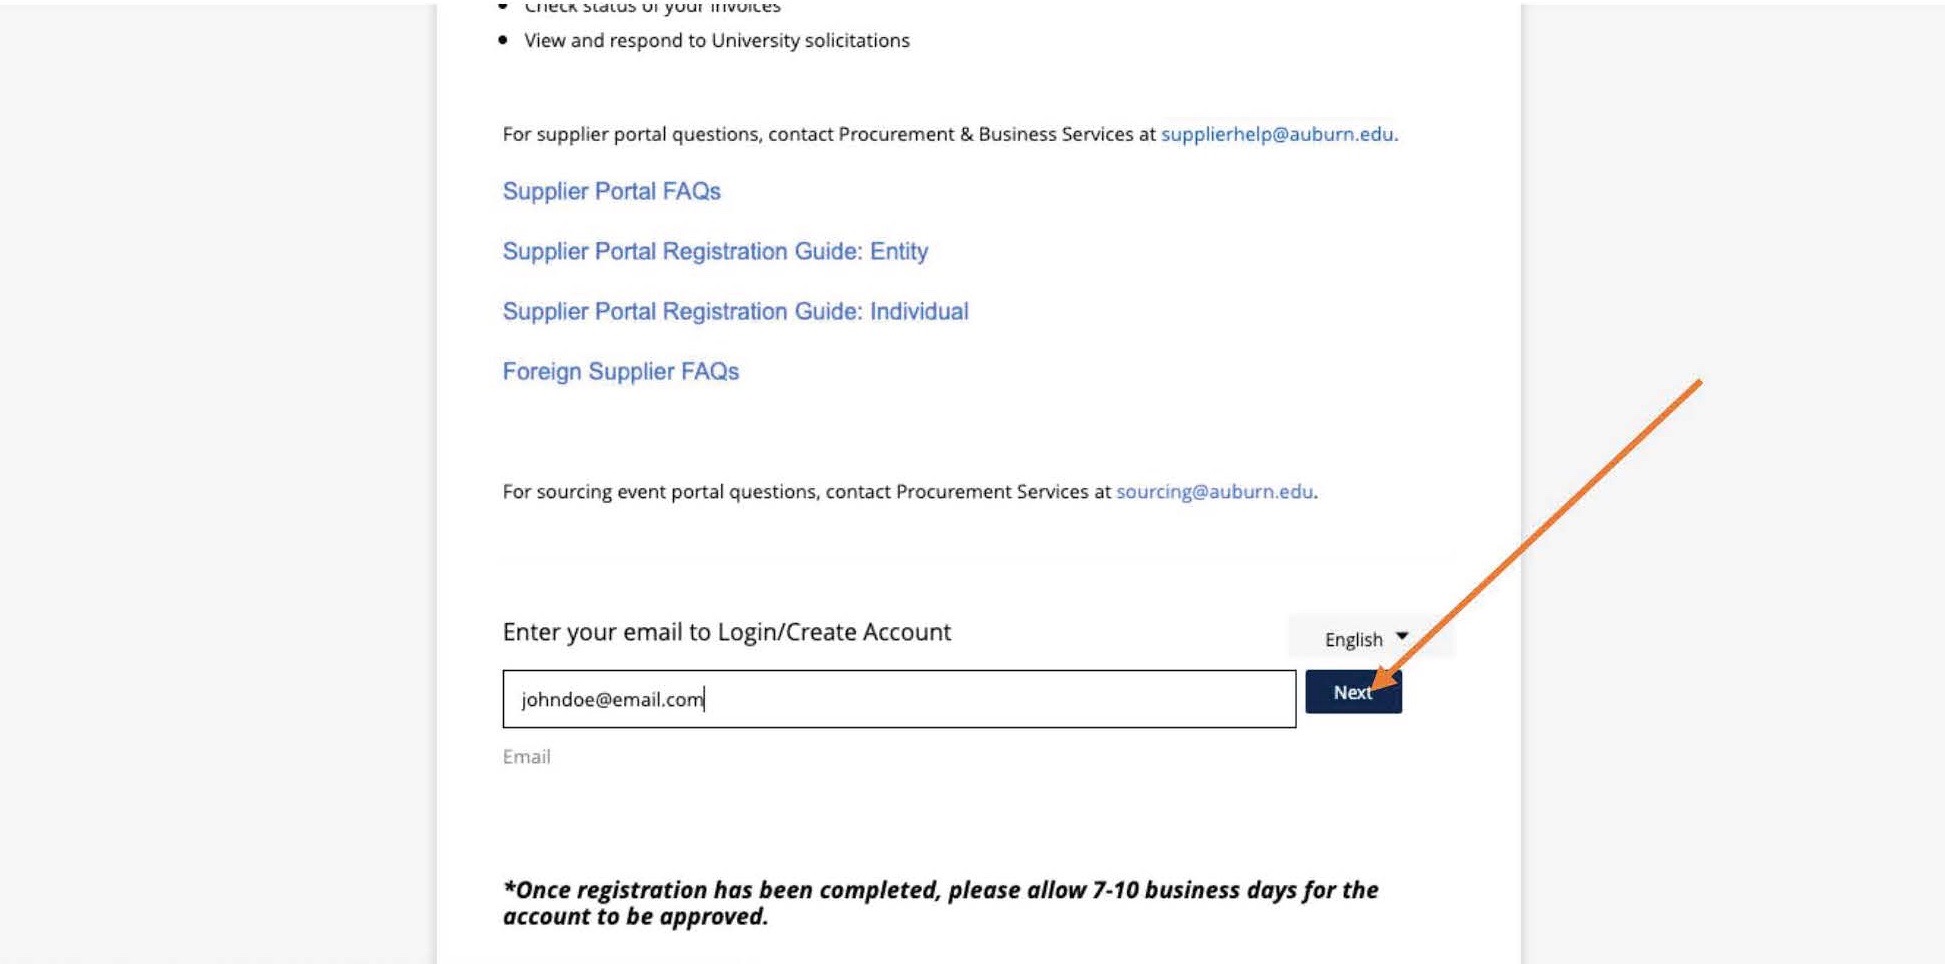
To create a new account, go to https://aub.ie/supplier and enter your email address. Click “Next.”
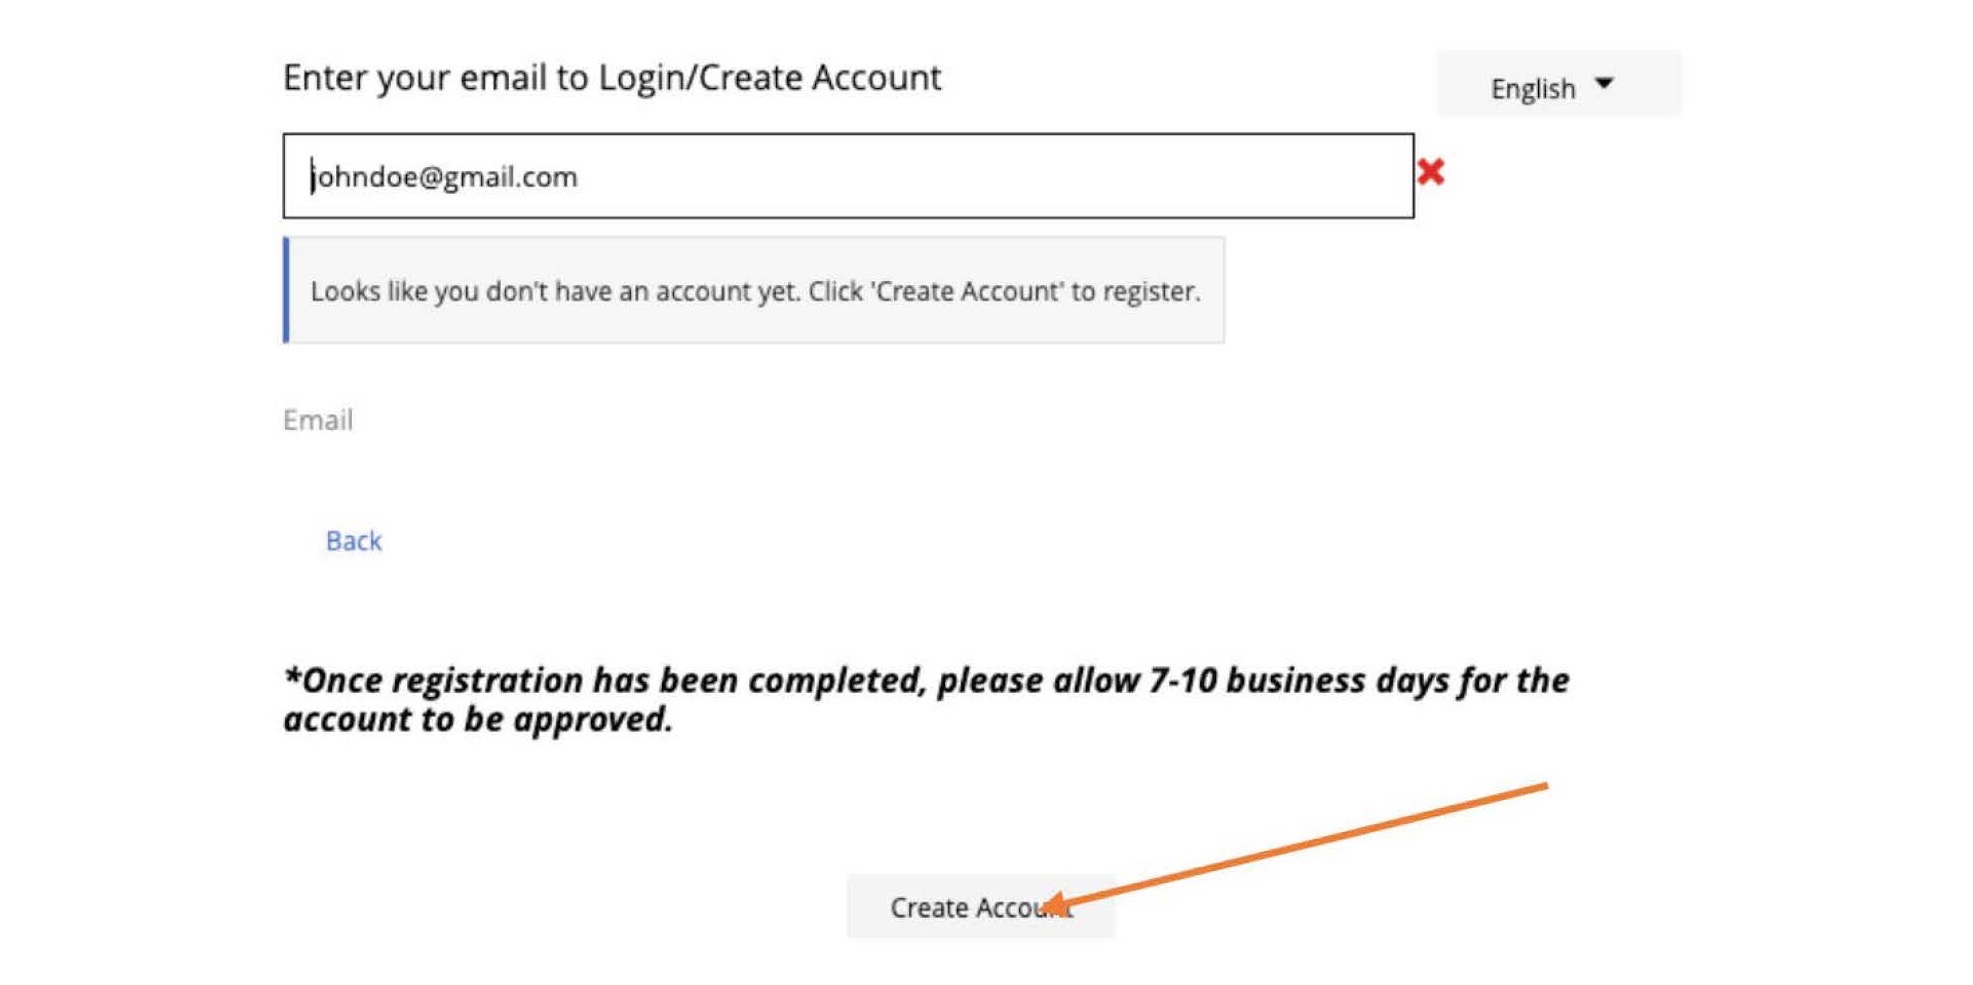
You likely do not have an account yet, so you will have to click “Create Account.”
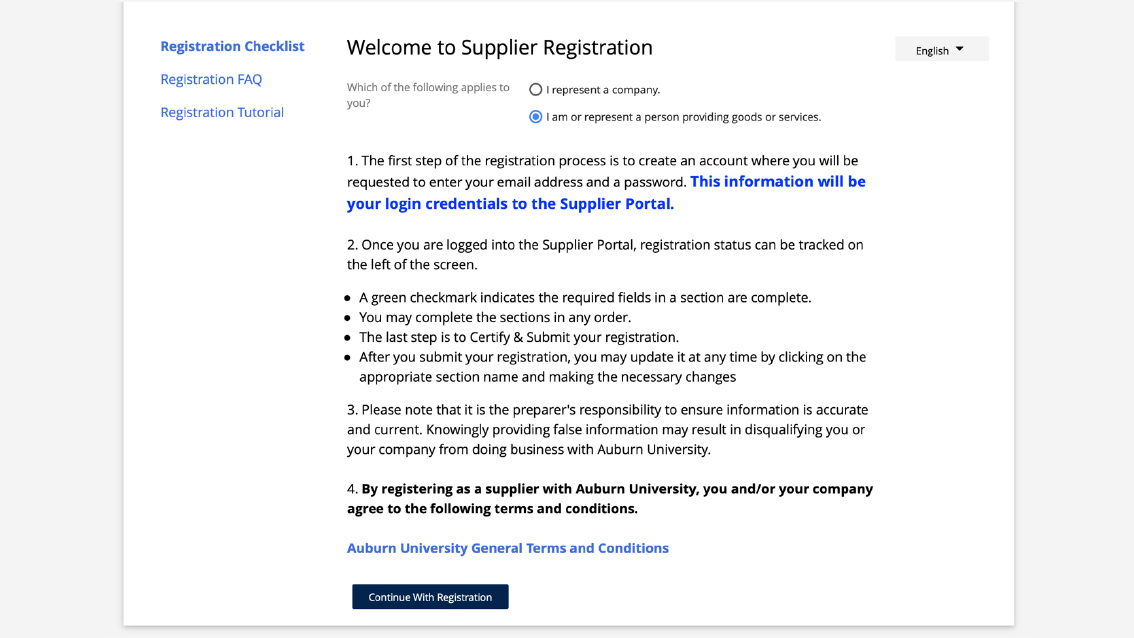
You will then need to click “I am or represent a person providing goods and services.”
Then click “Continue with registration.”
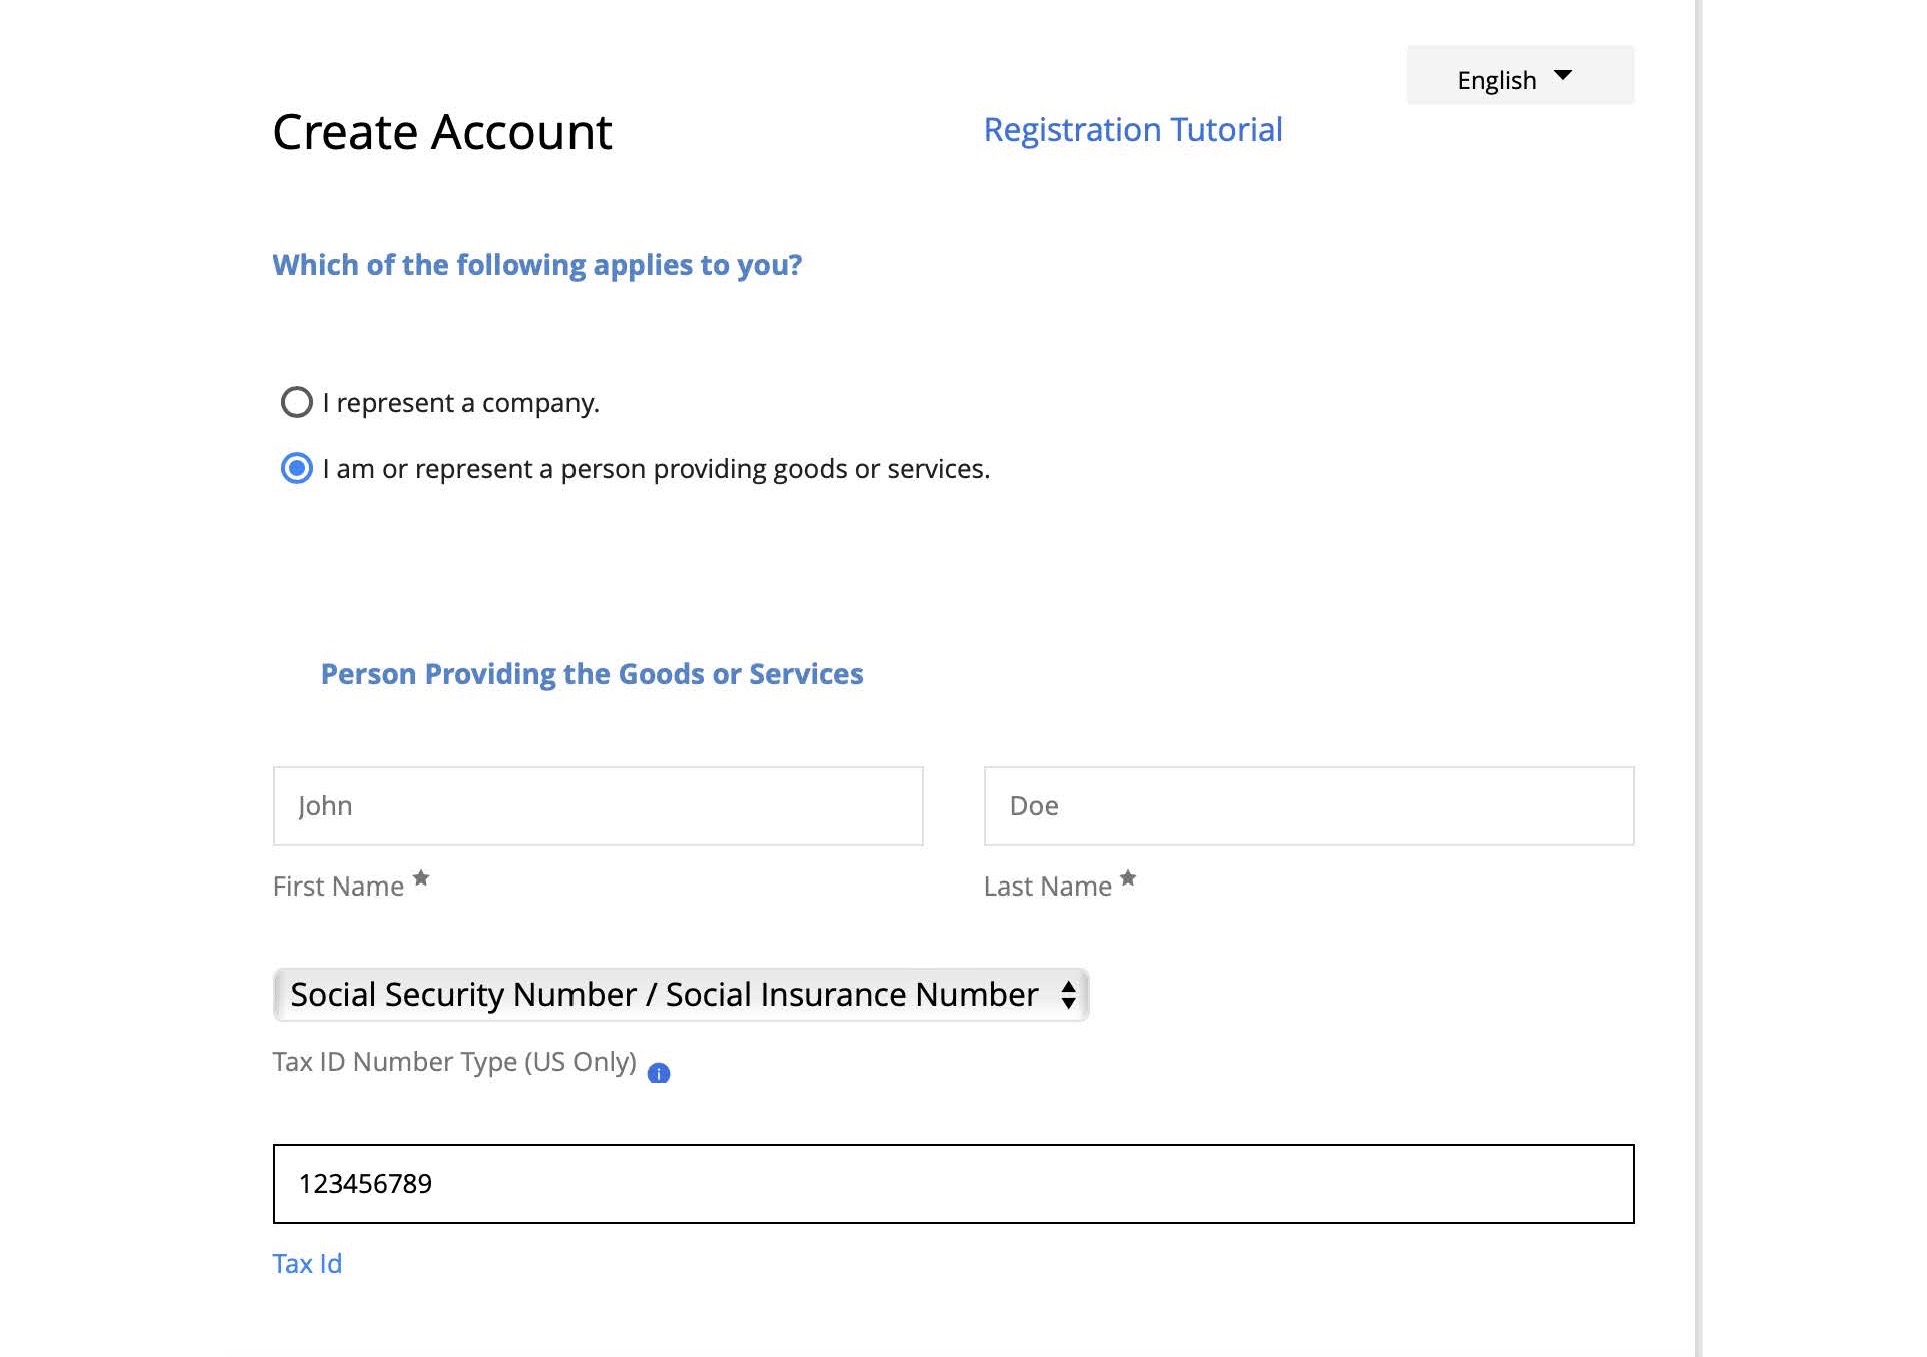
You will then need to select “I am or represent a person providing goods or services” again.
Fill out your name and select “Social Security Number / Social Insurance Number.” Fill in your SSN.
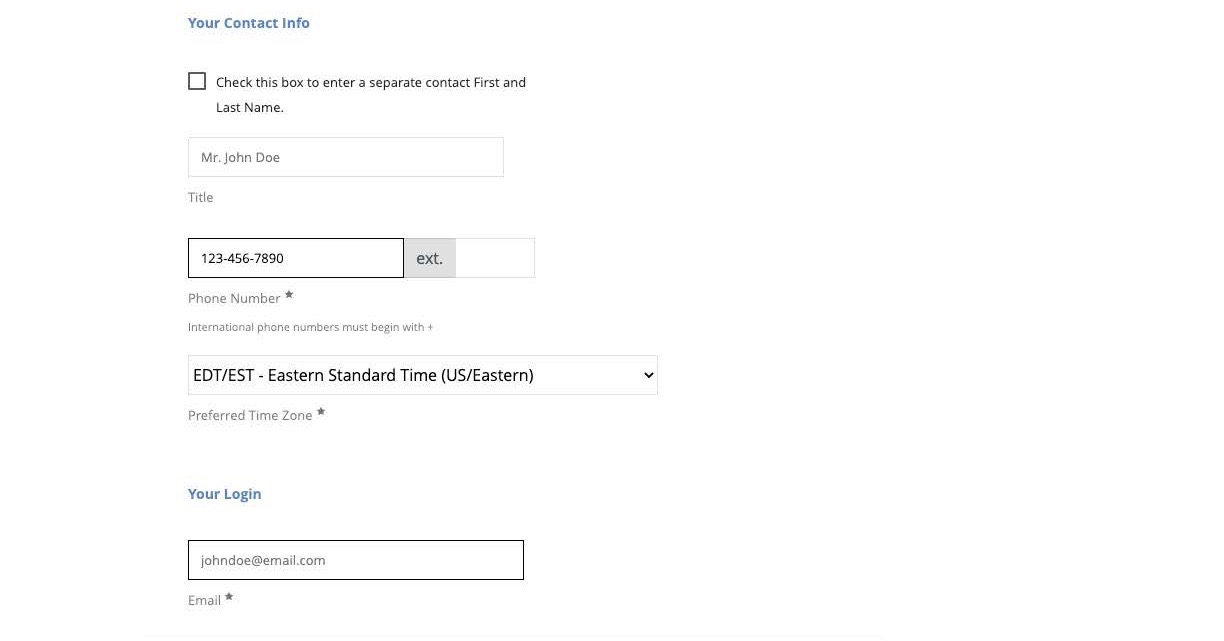
Fill in your title, phone number, time zone, and email.
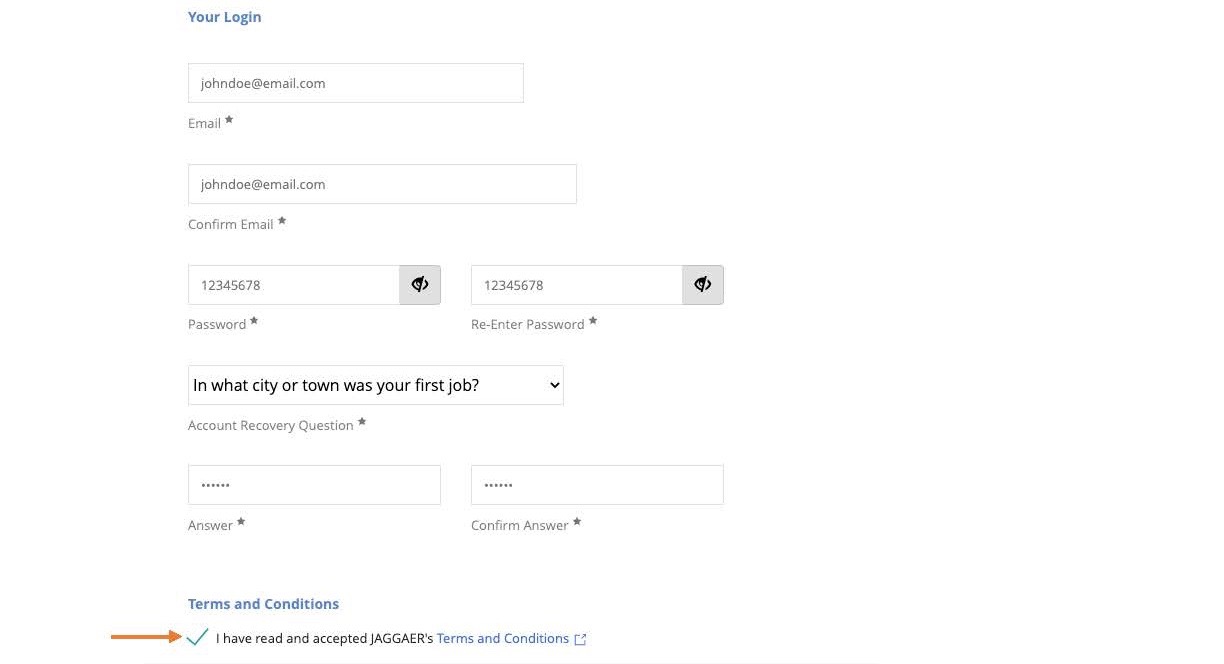
Re-enter your email, choose a password, and select an account recovery question. Review the terms and conditions by clicking on the blue link.
Check the box that you have read and accepted Jaggaer’s terms and conditions.
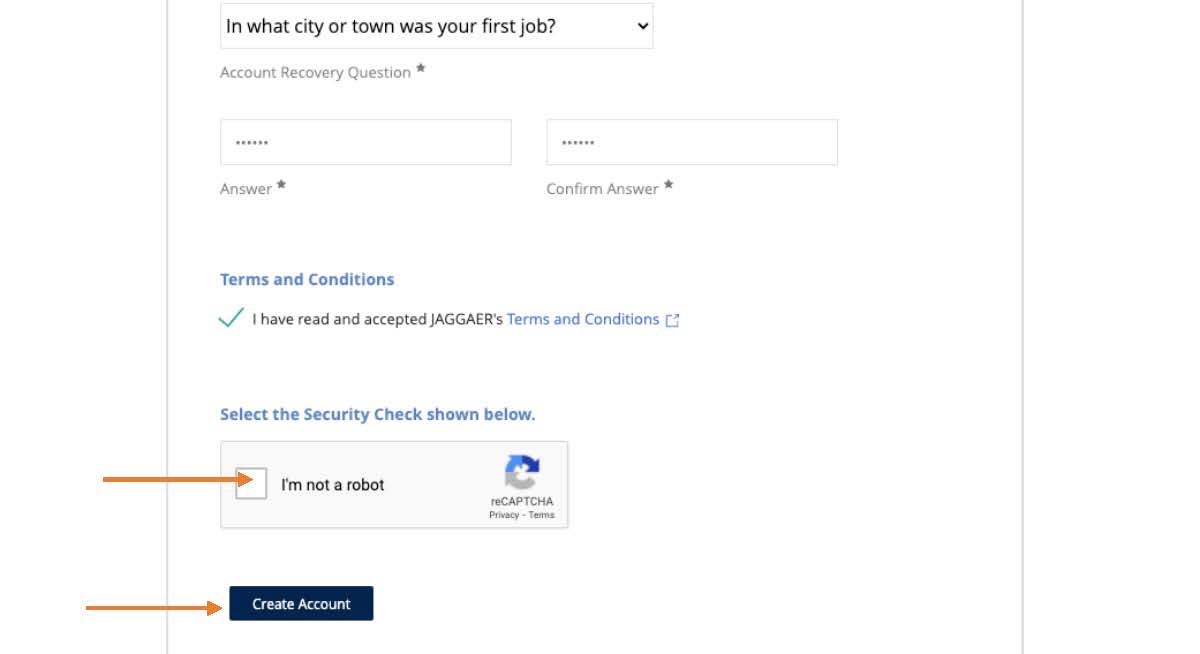
Click the “I’m not a robot” box and select “Create account.”
You will receive an email from supplierhelp@auburn.edu. This will come to the email you put into the website before. If you do not get an email within a couple of minutes, make sure to check your junk or spam folder.
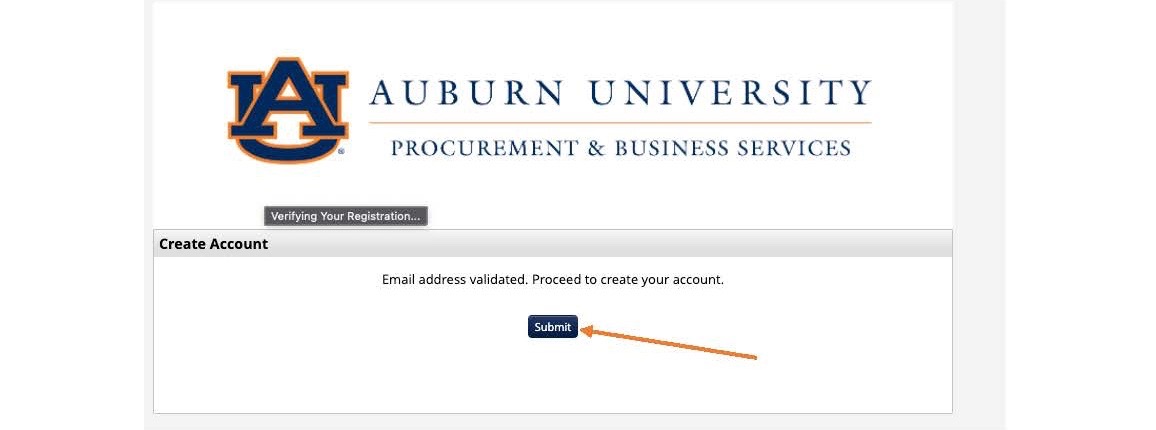
Once you receive your email from supplierhelp@auburn.edu, click “complete registration now.”
A new window should open. Click ‘Submit.’
You have now successfully created an account!
Step 2: Registering as a vendor
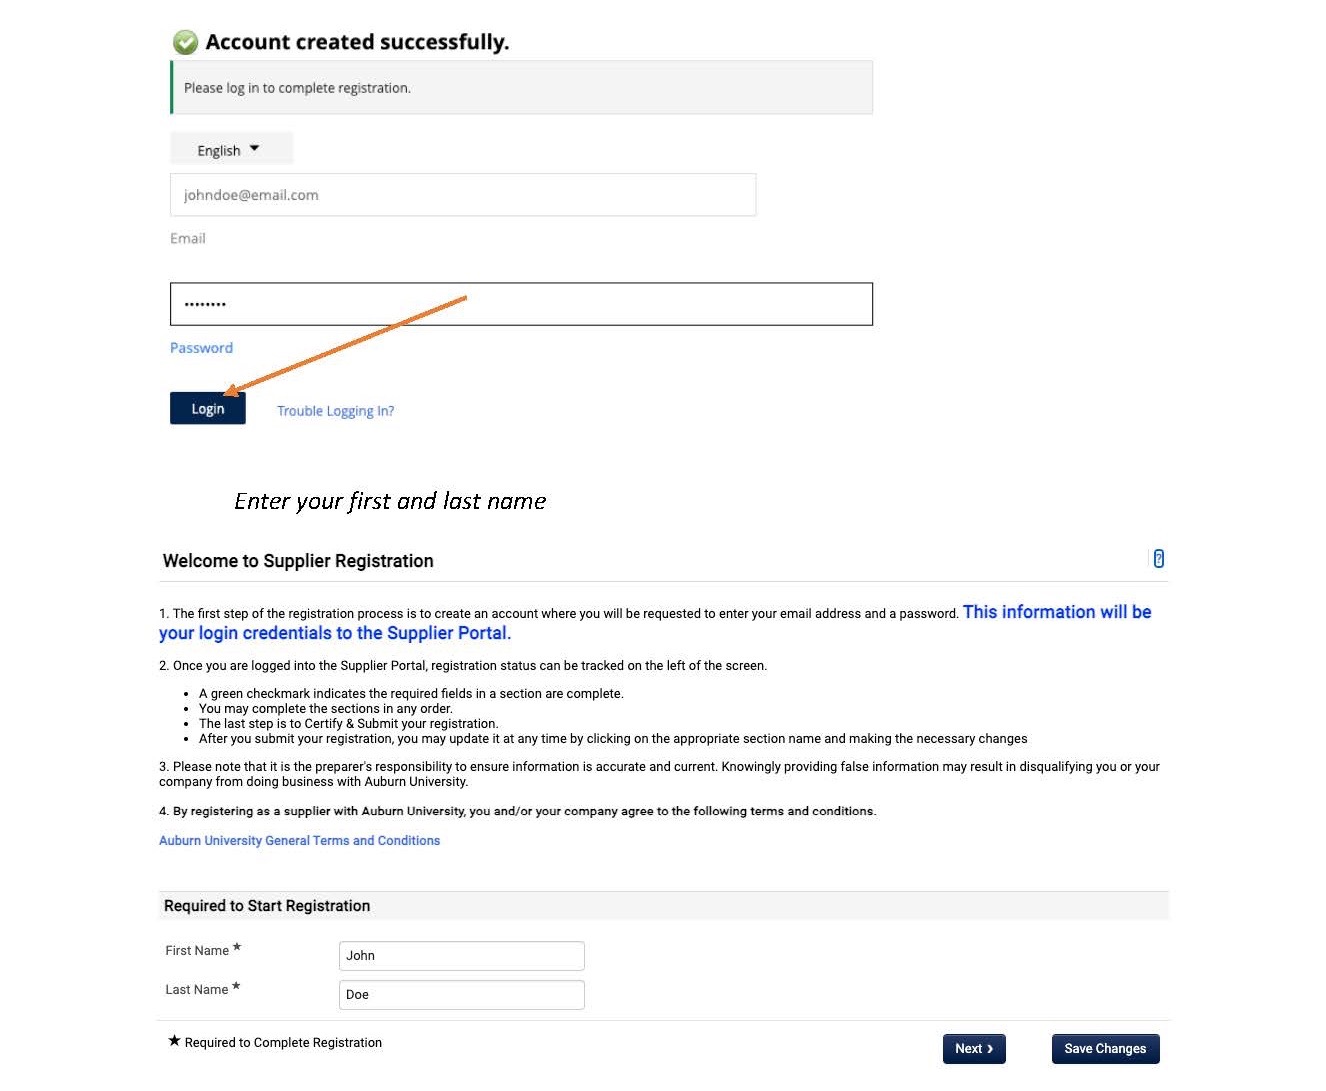
When you pressed submit you should have automatically been taken to a webpage prompting you to login with your email and password. Login using your information.
If this did not happen, use this link https://aub.ie/supplier.
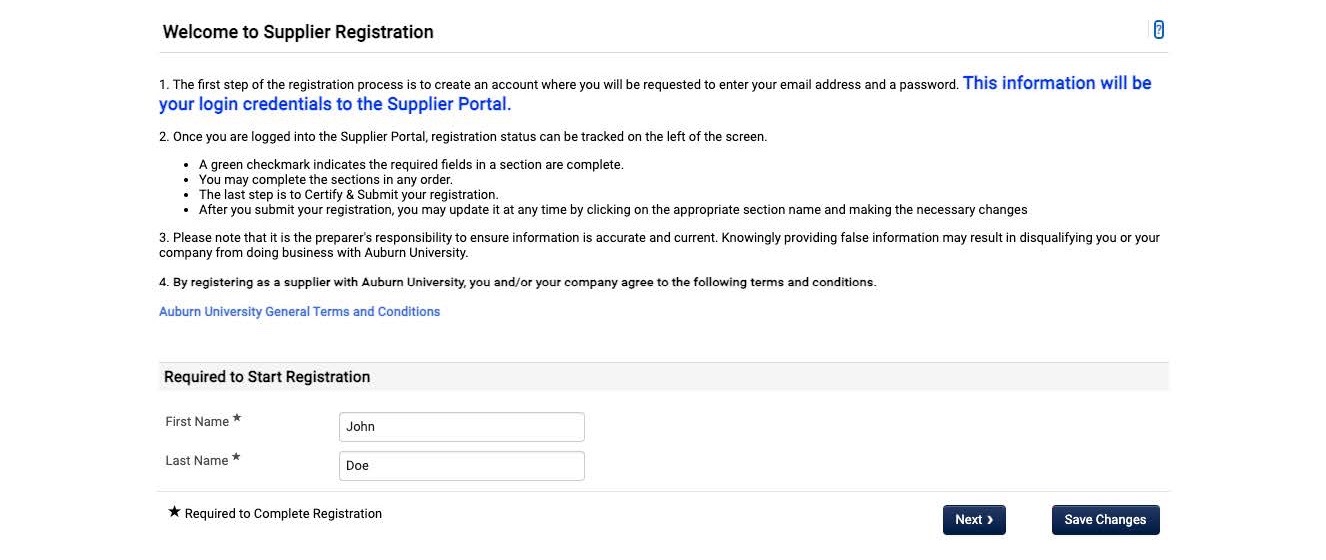
Enter your first and last name.
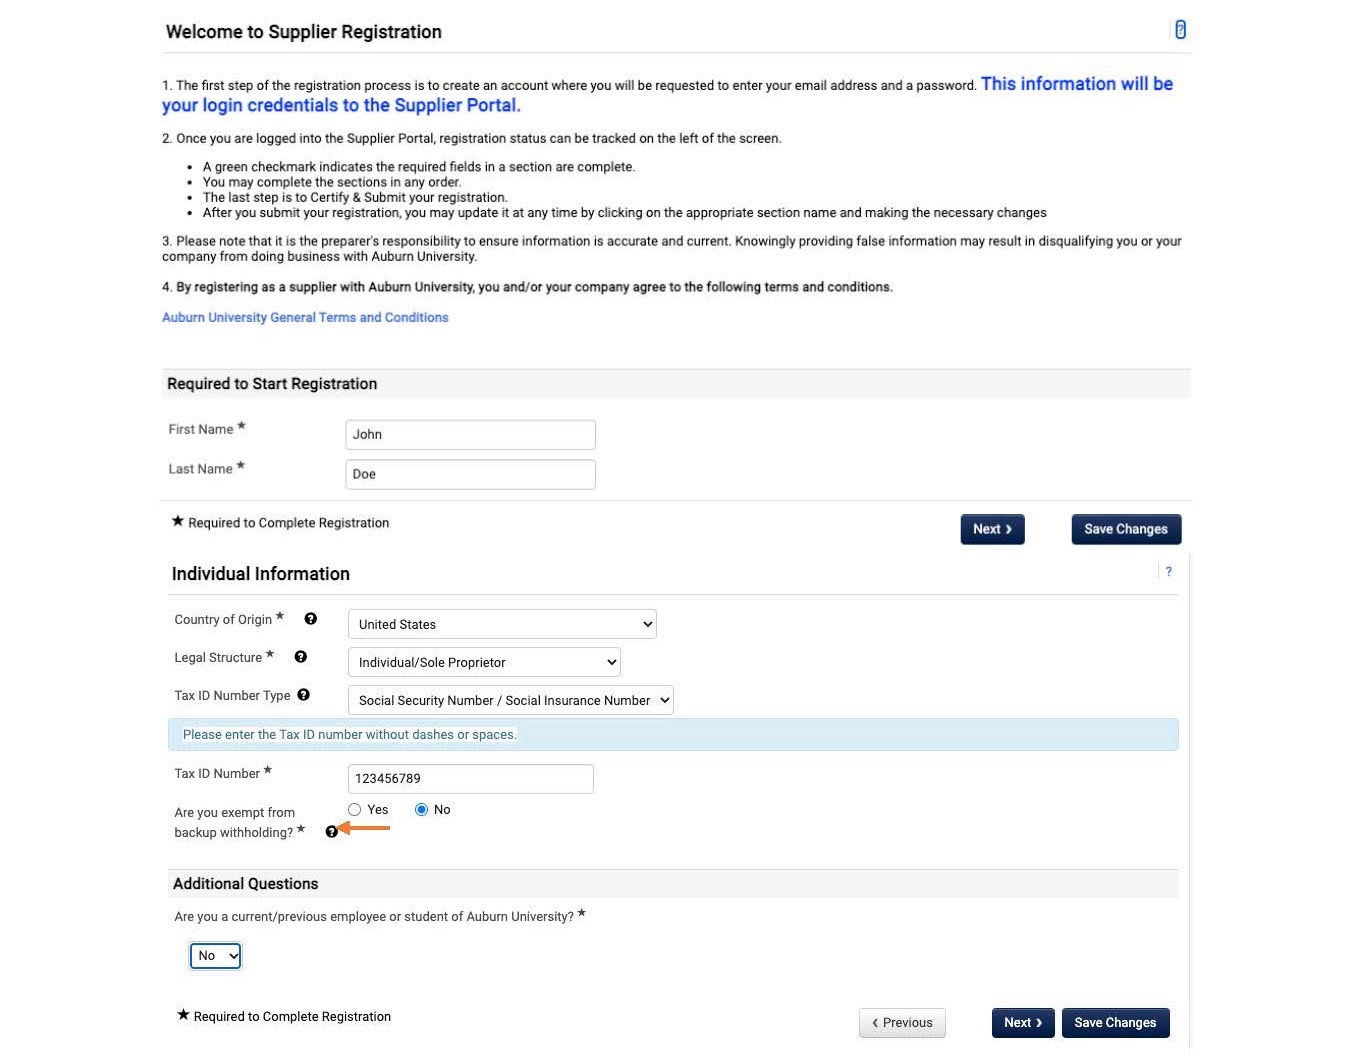
Enter the rest of your information. Select “No” if you are exempt from backup withholding. If you do not know if you are exempt press the “?” button.
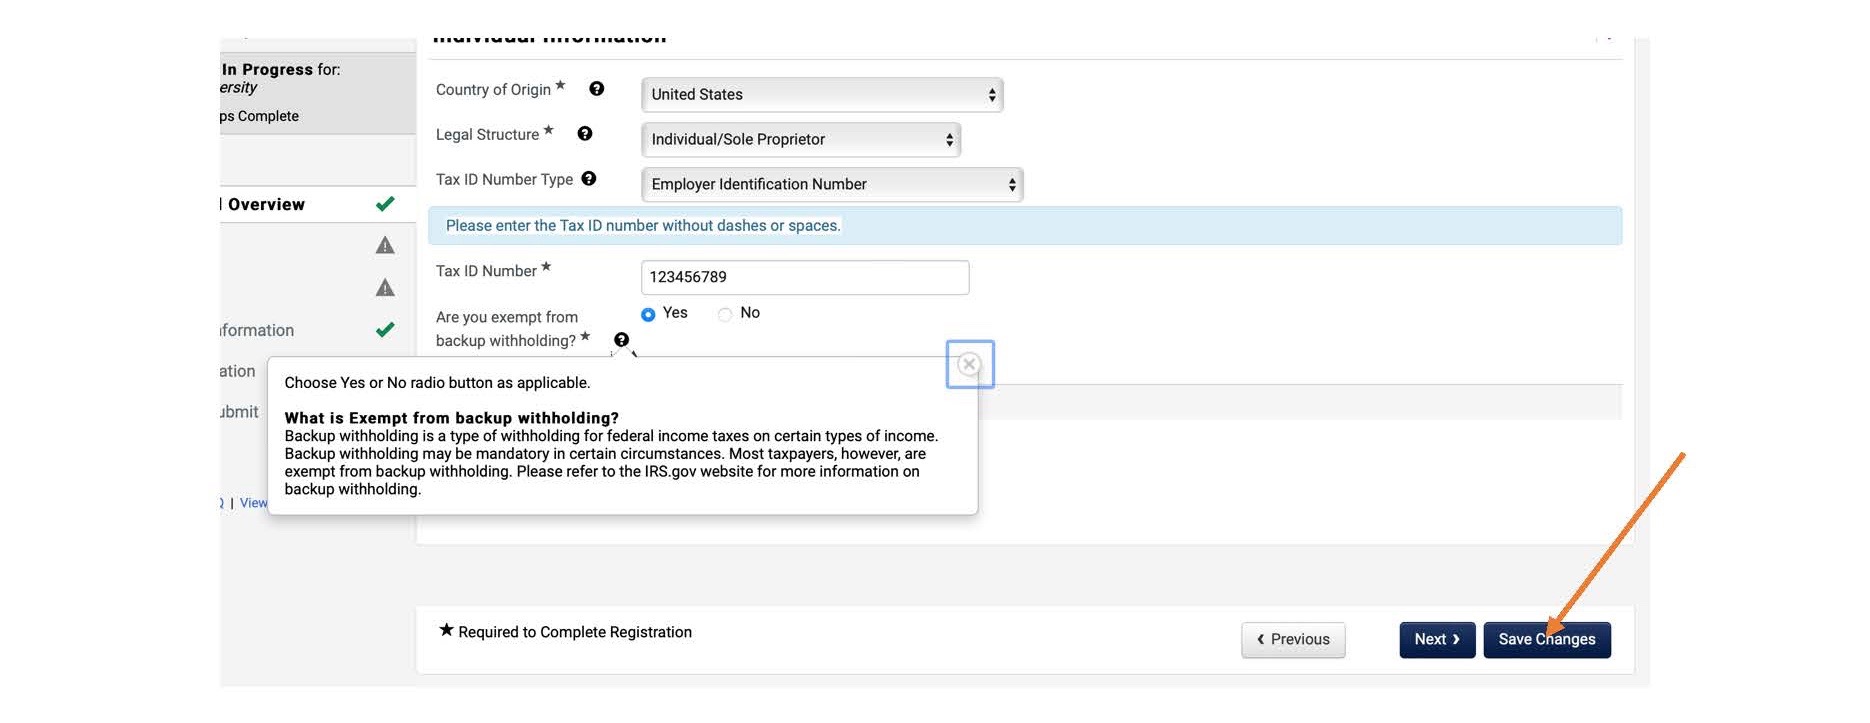
Using the information provided decide if you are exempt from backup withholding. Choose the appropriate response. Select “Save Changes”.
Add an address by clicking the “Add address button”.
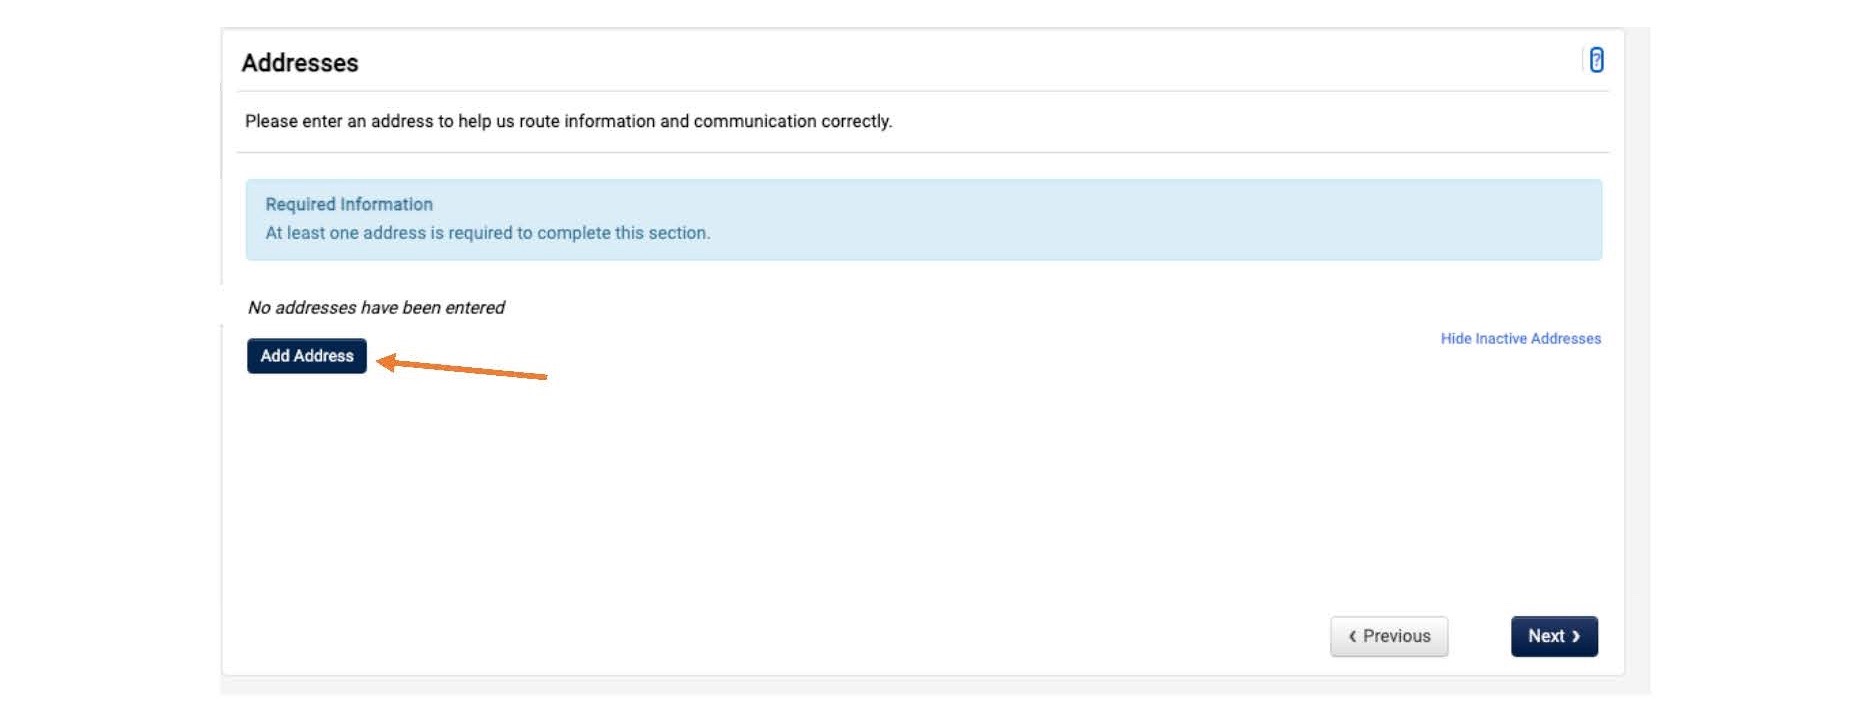
Fill out your address and phone number. Select “Next”.
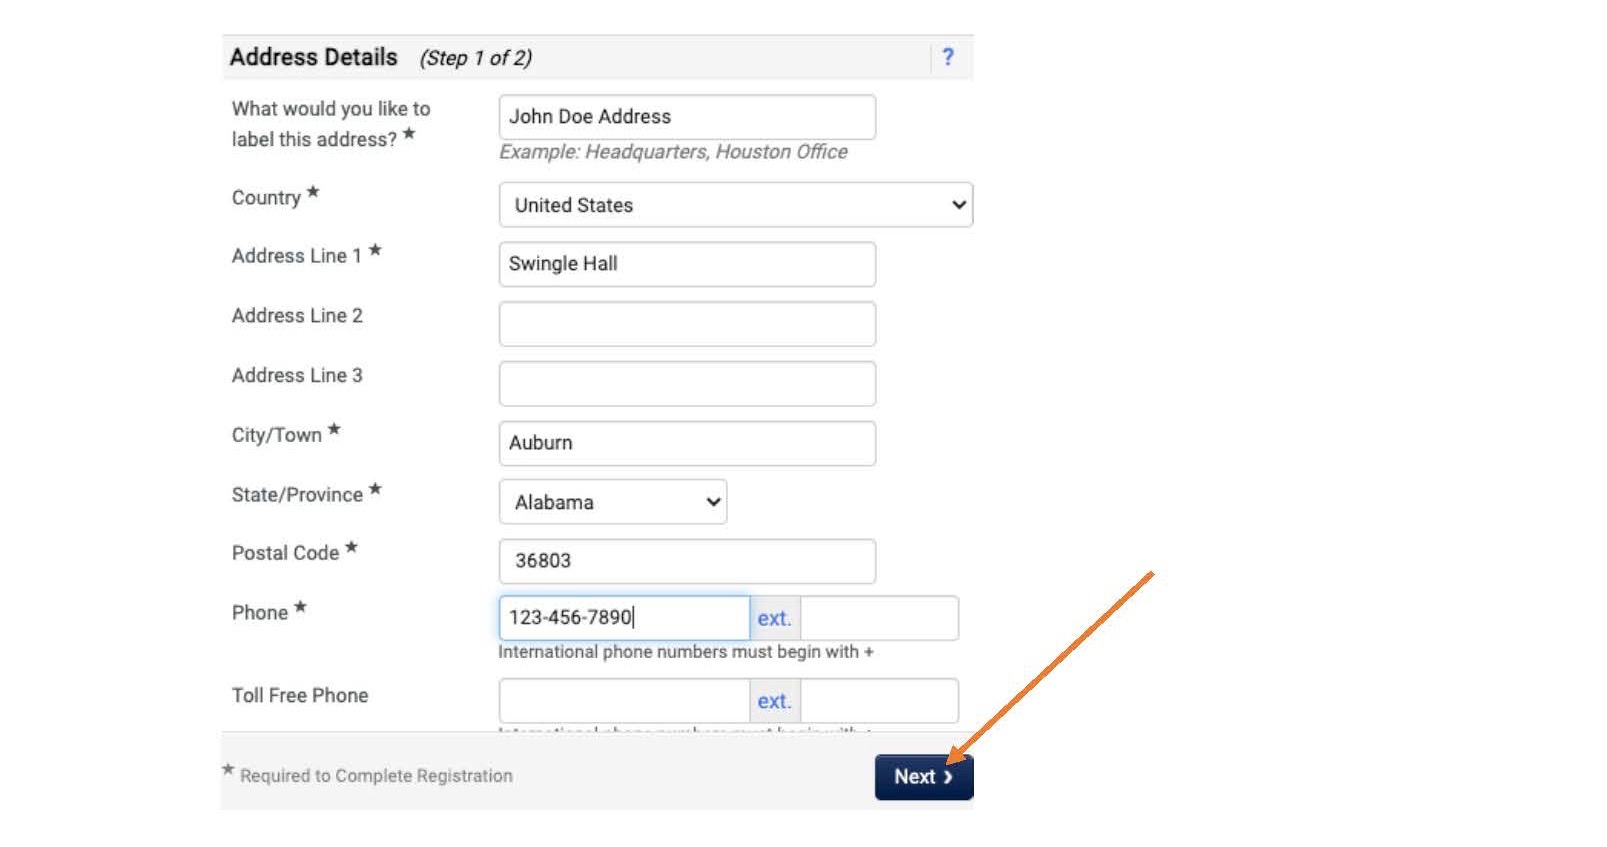
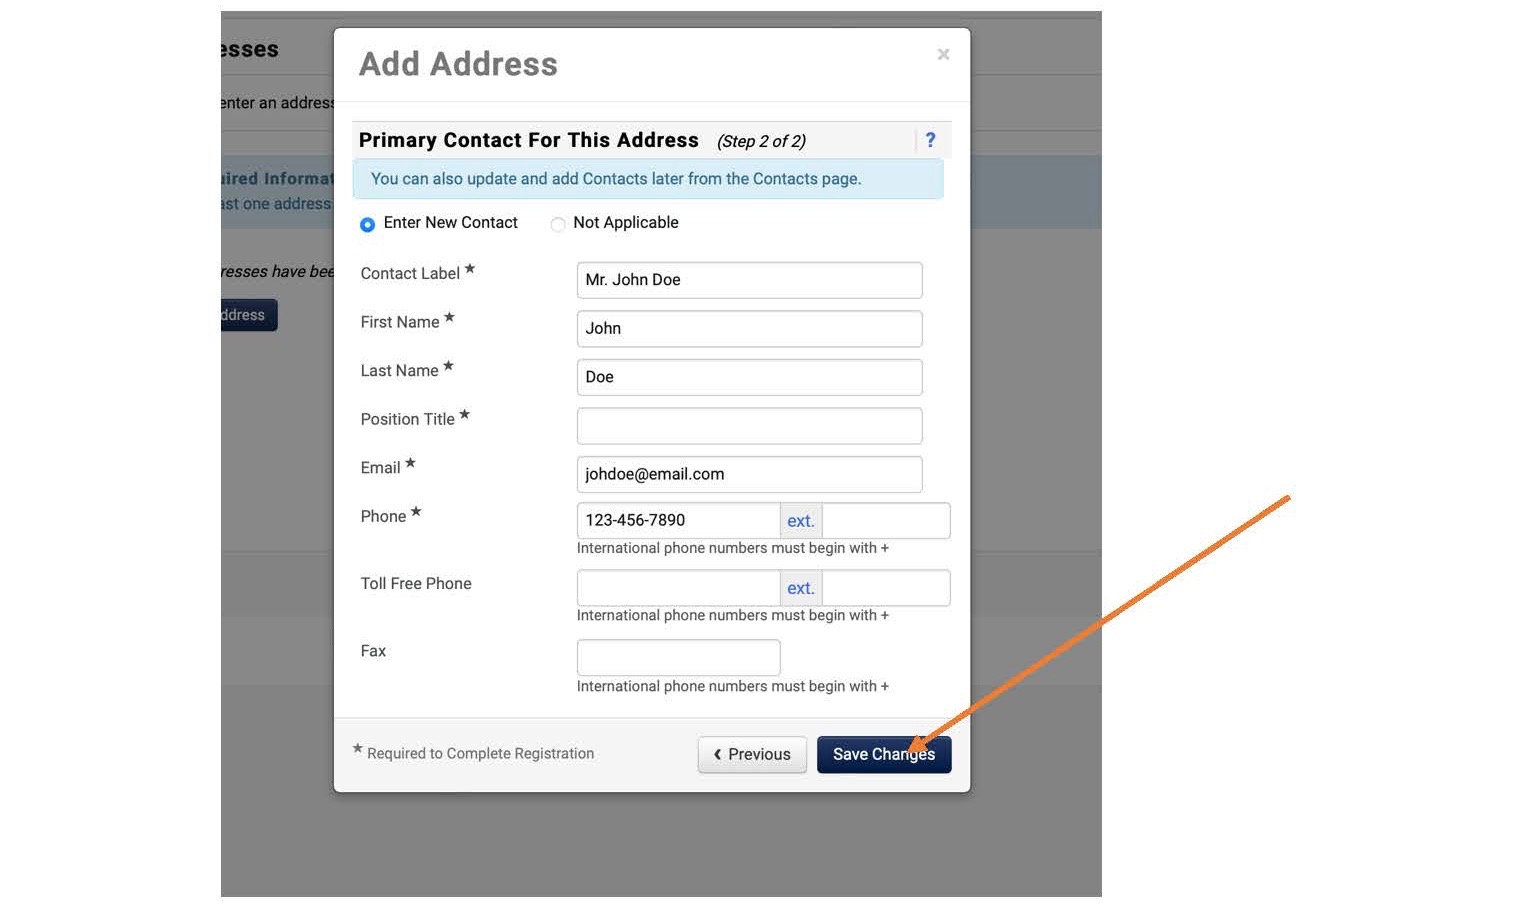
Re-enter your information and select “Save Changes”.
Click “Add Payment Information”.
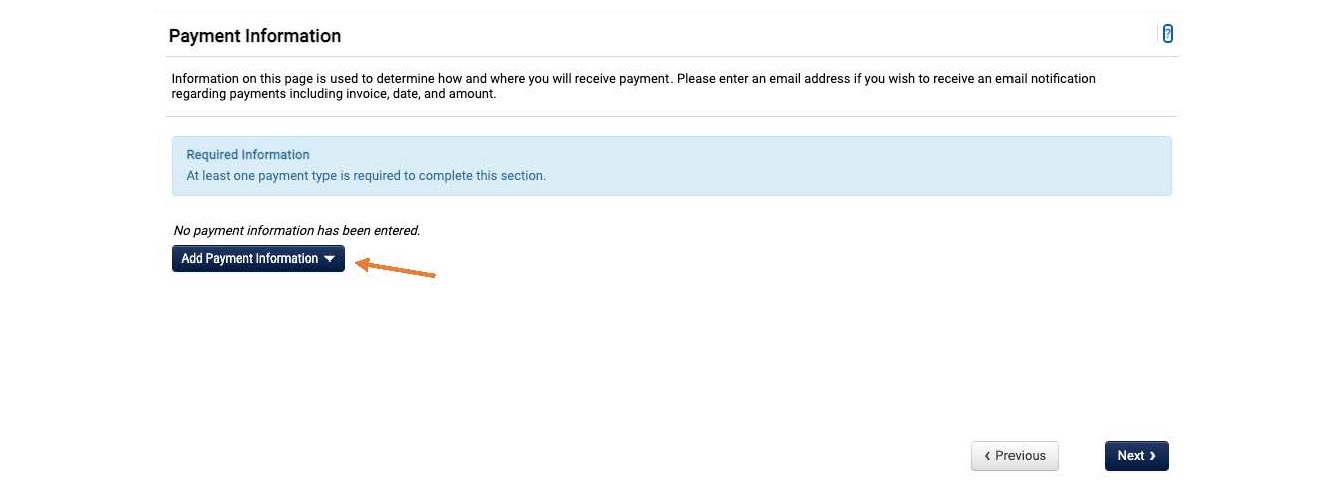
You will be given the option to choose payment via Direct Deposit or Check. Direct deposit is the fastest, and most secure method of payment and is recommended. However, we are able to mail you a check as well. Choose whatever method you are the most comfortable with.
This walkthrough will first show you how to set up payment by direct deposit. Then it will show you how to set up payment via check. You only need to do one of these options.
Option 1 – Setting up payment via direct deposit:
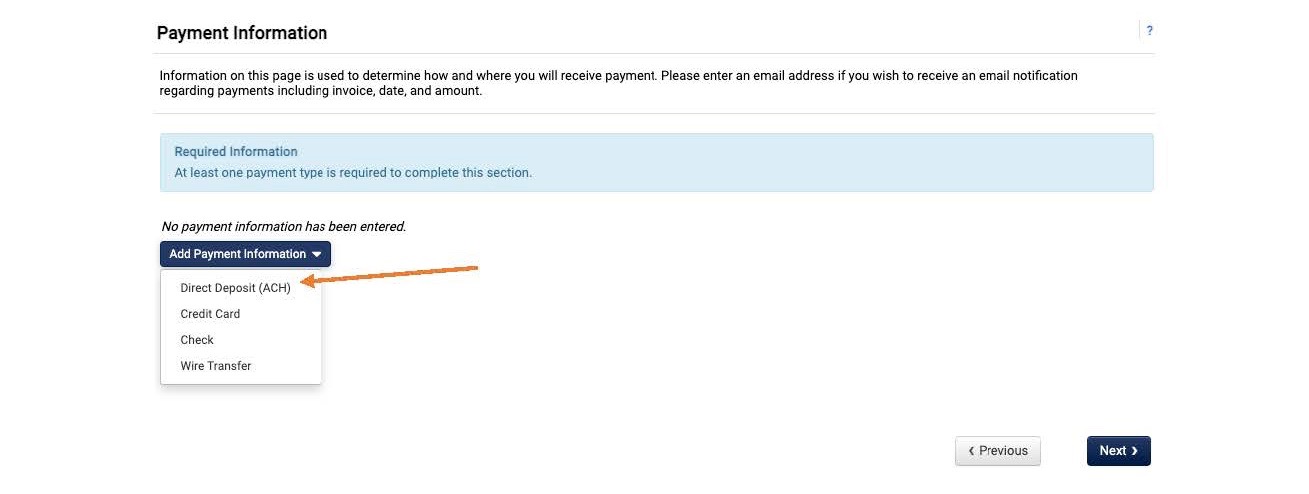
Select “Direct Deposit (ACH)”.
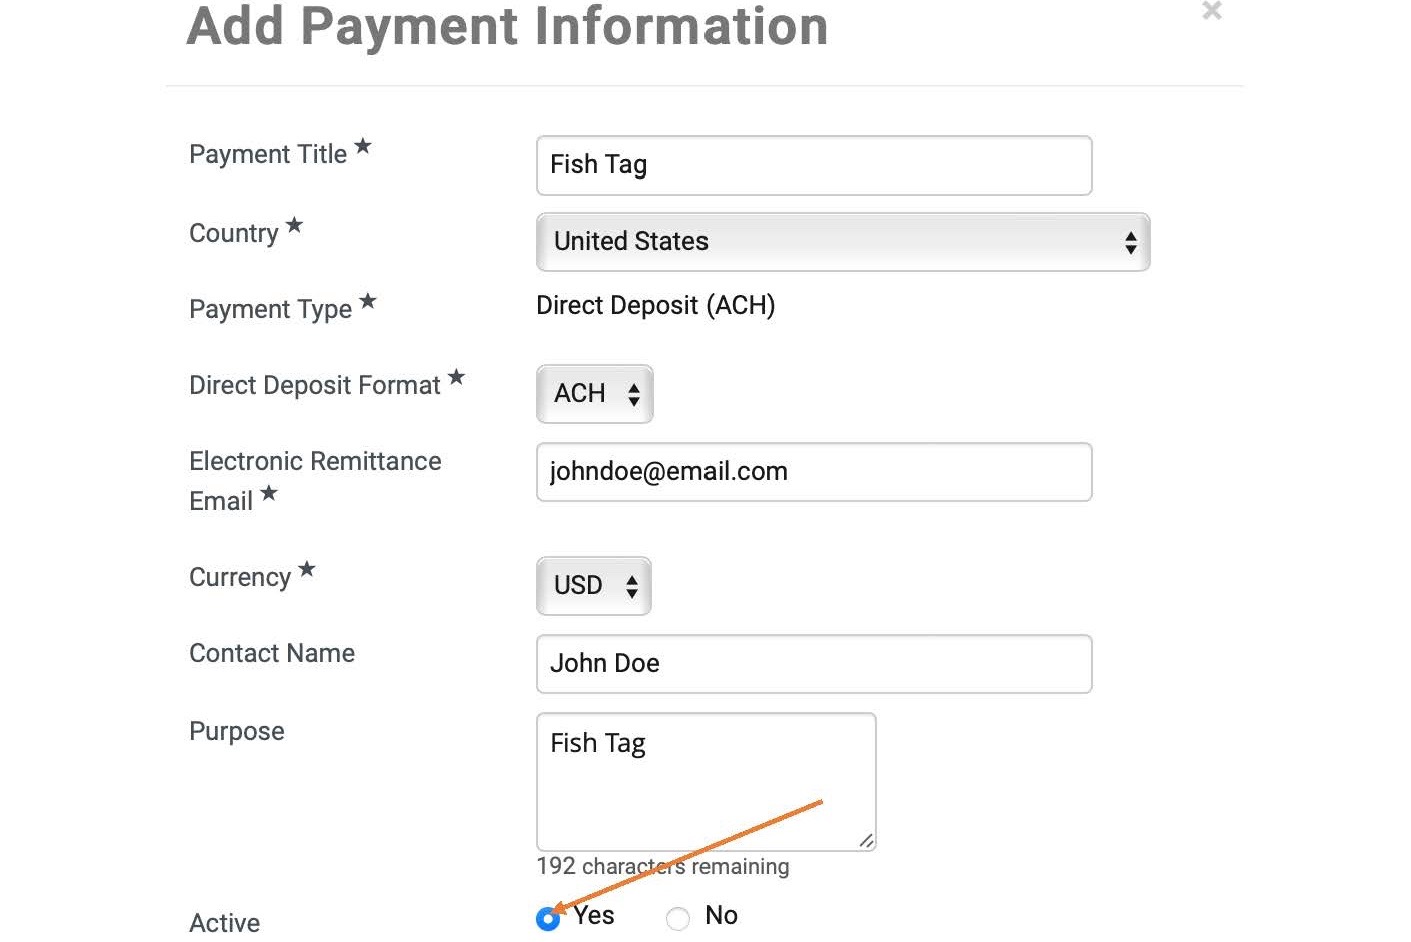
Enter “Fish Tag” as payment title. Put “ACH” as ‘Direct Deposit Format’, and “USD” as ‘Currency’. Under active select “yes”.
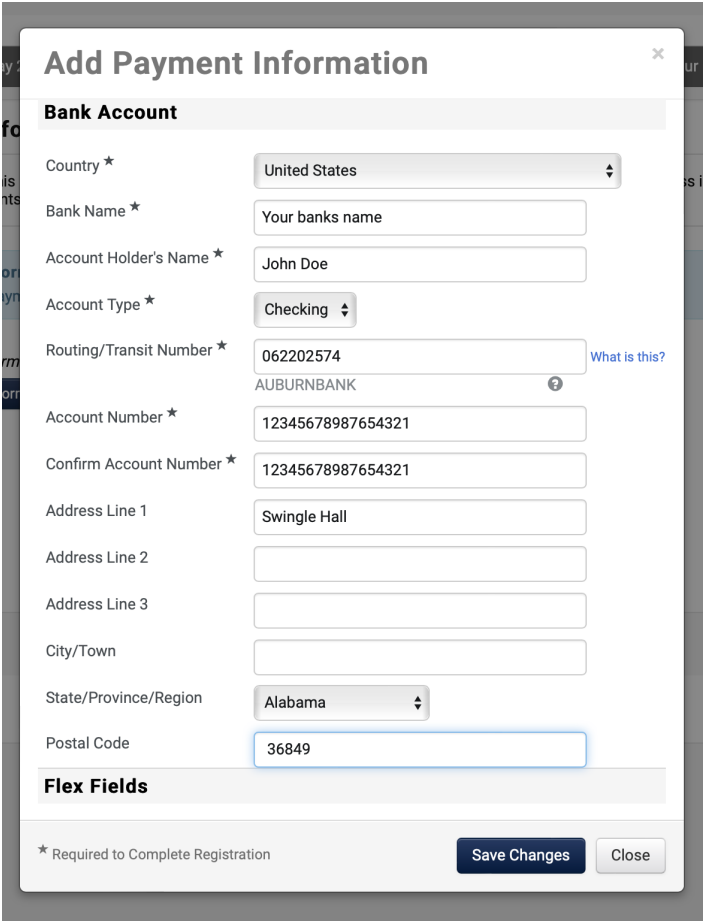
Scroll down and add your bank’s name, routing number, and your account number. Leave flex fields blank. Then select “Save changes”.
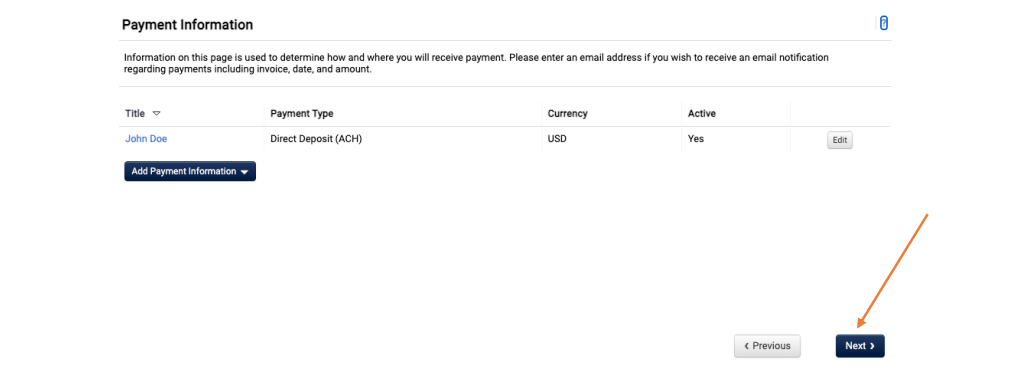
Select “Next”.
Option 2 – Setting up payment via check:
If you want to receive your reward as a check, select “Check” from the dropdown menu.
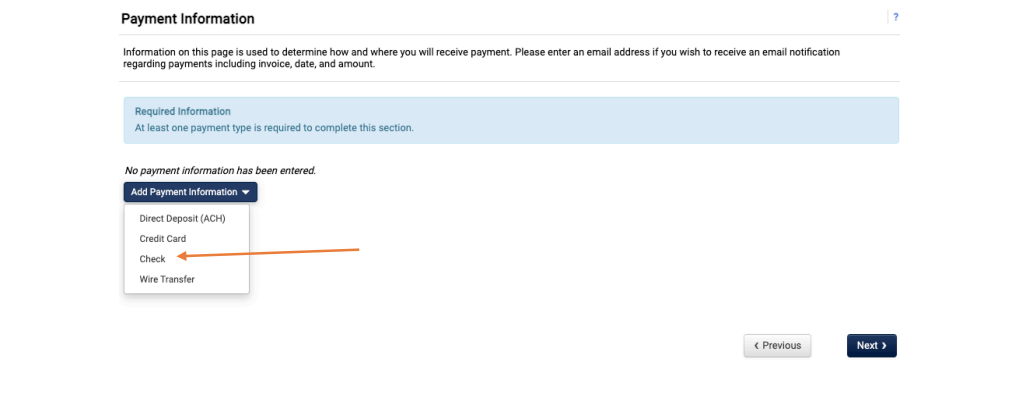
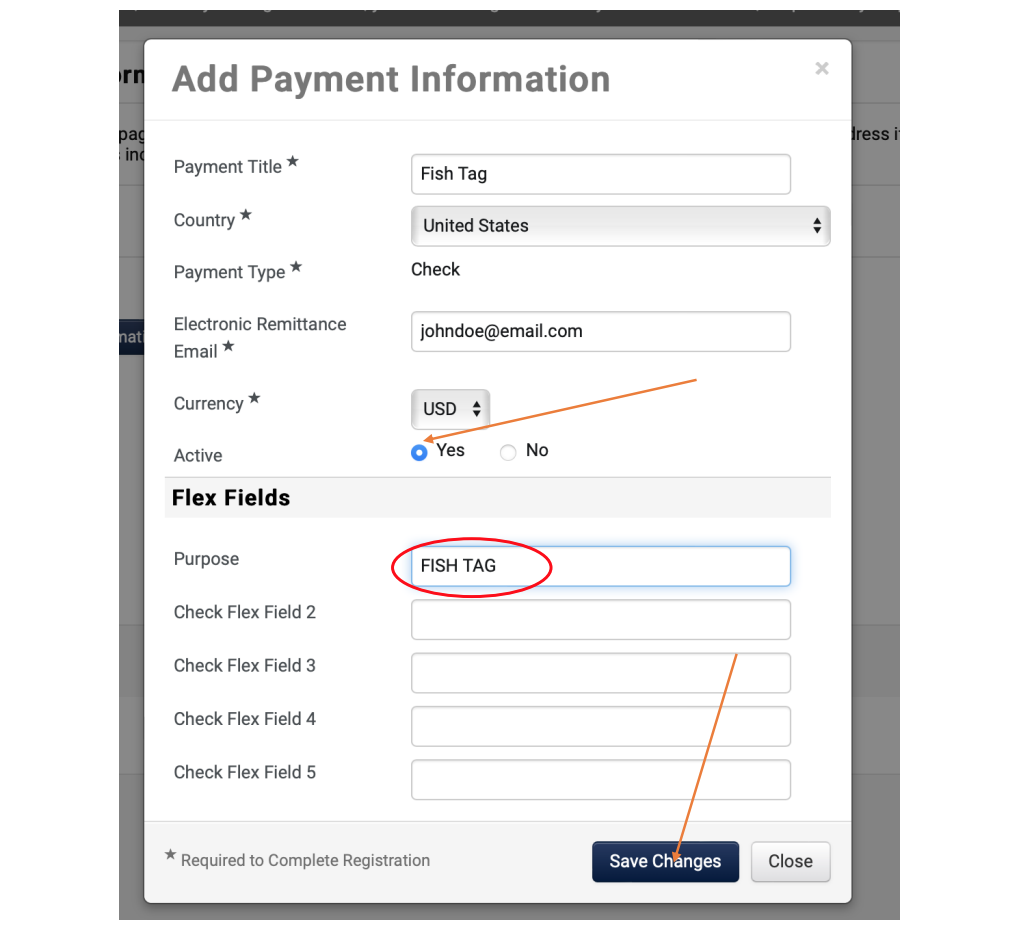
VERY IMPORTANT: PUT ‘FISH TAG’ AS PURPOSE. Under the payment title put “Fish Tag”. Enter your information. Click “Yes” for active. Then press “Save Changes”.
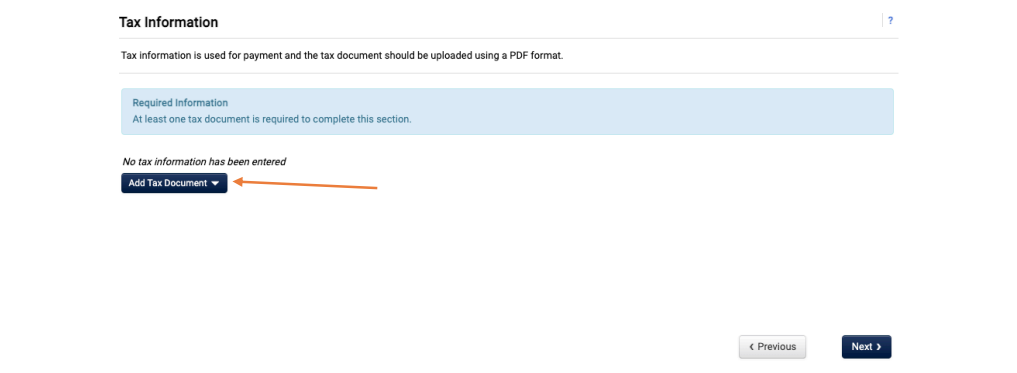
Next, you will need to add a tax document. In the past, you were required to sign and date the document. Now, you can simply certify and submit using a check box.
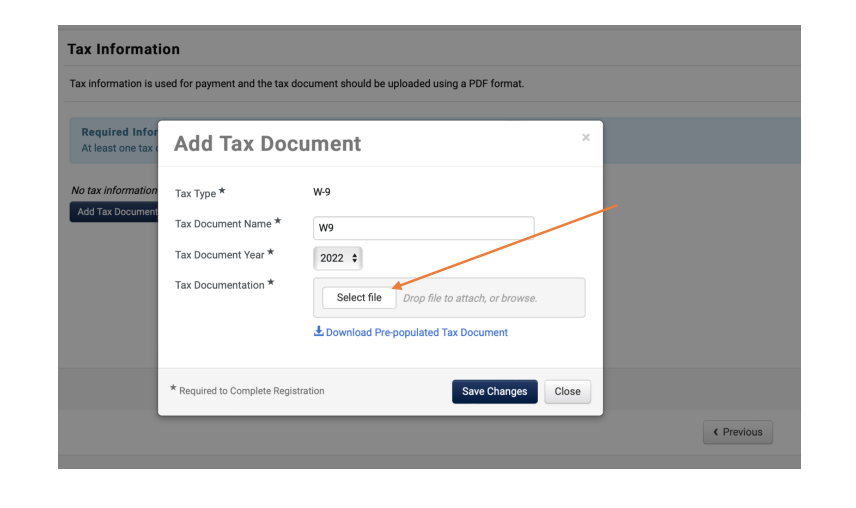
Click the “Add Tax Document” button on the Tax Information page.
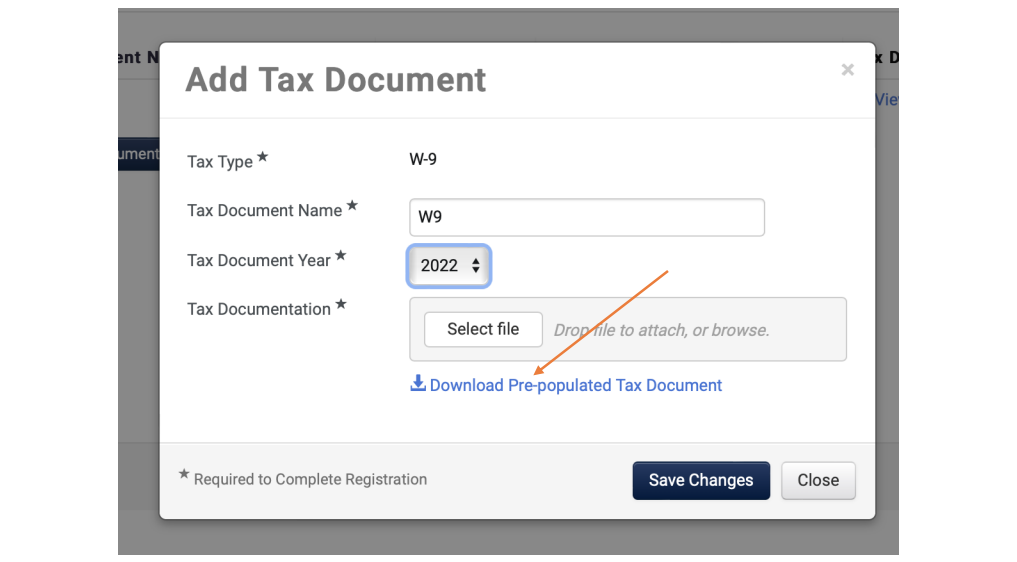
Name the tax document, select the current year, and click “Download Pre-populated Tax Document”. This document will already have your information on it, so you don’t need to add anything. All that you will need to do is upload following the instructions in the next steps.
Next, press “Select file” to upload the pre-populated tax document.
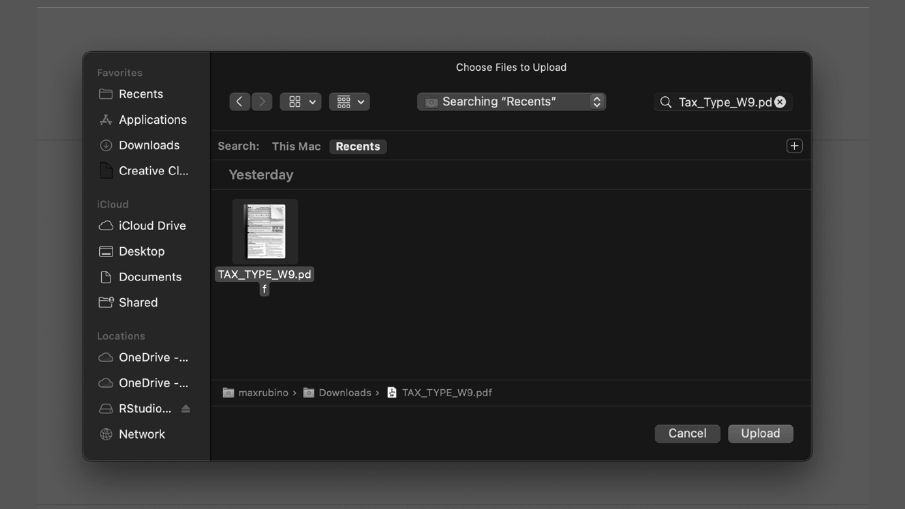
The file will be named “TAX_TYPE_W9.pdf”. You can search for it using the search bar or find it in your downloads folder. Press “Upload”.
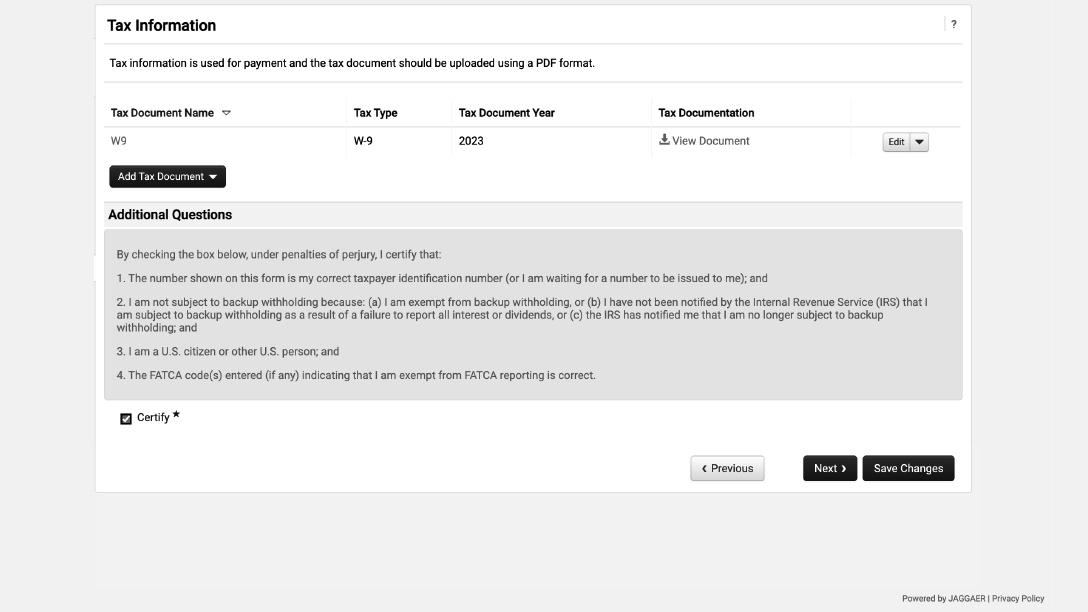
Wait a second for the bar to turn green. Then press “Save Changes”.
Click the “Certify” box and “Save Change”, then click next.
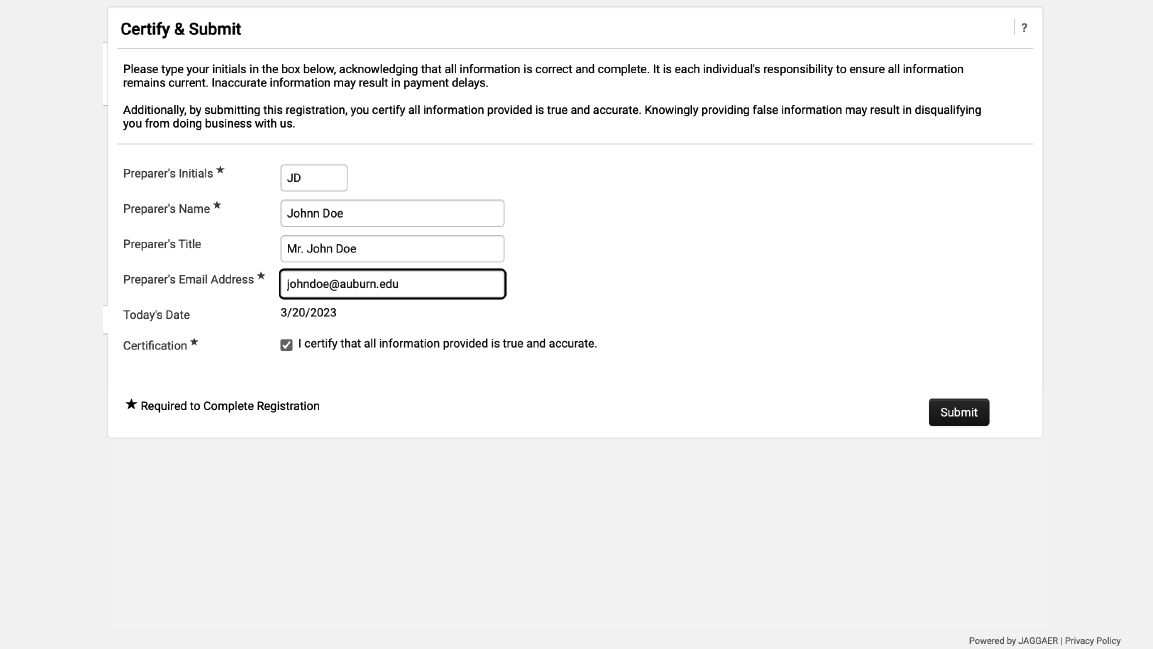
Fill out your information and click “I certify that all information provided is true and accurate”, then click “Submit”.
Congratulations, you have completed the vendor registration process! We appreciate your time and effort and look forward to paying your monetary reward.
If you were unable to complete the process, please contact us at ajtag@auburn.edu, or contact Anna Brazeal at abp0045@auburn.edu. You can also call us at 1(833) 515-5137.
Research Projects
Lab Team
Greater Amberjack Project & Tag Reporting
Fish Reward Tag Registration FAQ
Auburn Bass Tag Reporting Instructions
Step-by-Step Vendor Registration Guide
Contact
Auburn Univ, AL 36849

